Deploying a React App to Vercel


In this post, I will walk you through deploying a React app to Vercel using a code-first approach without Next.js. I will be using Node.js, React, and Vite, but this process should be similar for other JavaScript runtimes, frameworks, or bundlers. Using a code-first approach without Next.js will help avoid lock-in, so you can more easily migrate your application to a different framework or service if you choose to do so.
You can fork the template from daniel-nagy/vercel-react-vite-template to quickly start building your own custom app. The source code from this post can be found in that repo.
Before We Begin
Before we begin, I want to point out some of the tradeoffs of using a serverless cloud service for hosting your web application, in case any of these make serverless a non-starter for your application.
Benefits
There are benefits to using a serverless cloud service. Among these benefits are:
- The ability to automatically scale your application up or down based on the amount of traffic to your site.
- Not having to create and maintain your own backend infrastructure.
- Being able to deploy API and client changes at the same time.
While you can deploy your API and client changes together, your users may still have an older version of your application open in the browser.
However, there are some drawbacks and limitations that you should be aware of.
Cold Starts
The first drawback I want to mention is cold starts 🥶. After a period of inactivity, the process your serverless function is running in will be suspended. When this happens, the next request to your Web server will need to wait for your serverless function to restart. The process of restarting your serverless function can be lengthy, especially for Node.js applications.
Stateless By Nature
The second limitation I want to mention is that serverless functions are stateless. Because your serverless functions may be suspended, at the discretion of your service provider, you cannot hold state or cache in memory in your serverless function. By consequence, you cannot use WebSockets in a serverless function. For example, this means you cannot expose a GraphQL API with subscriptions from a serverless function.
If these drawbacks and limitations are acceptable to you, or if you're just curious what deploying a custom React app to Vercel is like, then let's begin.
Let's Begin
I will be creating a React app with server rendering and deploying it to Vercel. I will be using the following technologies:
- esbuild — An extremely fast JavaScript bundler.
- GitHub Actions — A workflow automation framework.
- Node.js — A JavaScript runtime.
- React — A component syntax for JavaScript.
- TypeScript — A statically typed version of JavaScript.
- Vercel — A serverless cloud provider.
- Vite — A Web compiler.
- Yarn — A Node.js package manager.
While I will be using these technologies specifically, this process should be similar using other technologies such as Bun or Solid.js.
To follow along, you will need git, node, and yarn installed and accessible from your $PATH. Installing these is outside the scope of this post. I use asdf to manage system dependencies.
Creating Workspaces
I will be using yarn workspaces to help create a barrier between the API and the client. To get started, I will create a new project and add two workspaces, one for my API and one for my React app.
❯ mkdir my-app && cd my-app❯ git init❯ mkdir api app❯ touch package.json api/package.json app/package.jsonAnd here is the content of each package.json file.
With my workspaces set up, I will move on to creating my React app.
Creating a React App
Next, I will create a very simple "Hello, World!" React app. I will start by adding the necessary dependencies to my app workspace.
❯ yarn workspace app add react react-dom❯ yarn workspace app add -D @types/react @types/react-dom @vitejs/plugin-react typescript viteThe React plugin for Vite will enable "Fast Refresh" and automatic JSX transformation, so I don't have to import React in every file that contains JSX.
Here is the code for my "Hello, World!" React app.
I can now run the start command to start the Vite dev server.
❯ yarn workspace app startThe start command is an npm script. See the scripts property in the package.json file. Now if I open http://localhost:3000 in the browser, I will see the text "Hello, World!". If you're following along, try modifying the text and saving the file while the dev server is running. The text should update in the browser without a page reload.
To build the app for production, I will run the build command.
❯ yarn workspace app buildThe build command will generate a folder called build in the app workspace containing the optimized bundle for production. Notice I also run the TypeScript compiler before building the app with Vite. This is because Vite will only transpile TypeScript. Meaning it won't fail the build if there are type errors!
Next, I will begin setting up Vercel.
Inviting Vercel to the Party
It's time to invite Vercel to the party. I'll start by adding the Vercel CLI to the workspace root.
❯ yarn add -W vercelThe -W flag suppresses a warning from yarn about installing dependencies in the workspace root. Next, I will create a vercel.json file in the workspace root containing my project configuration.
{ "buildCommand": "yarn workspace app build", "devCommand": "yarn workspace app start --port $PORT", "framework": "vite", "installCommand": "yarn install --frozen-lockfile", "outputDirectory": "app/build"}Notice I pass a port to the start command in the app workspace. Internally, Vercel will run the dev command in a child process and replace $PORT with a randomly available port. That means my Vite dev server will no longer be listening on port 3000 but on a random port selected by Vercel. This allows Vercel's dev server to proxy my Vite dev server. By default, the Vercel dev server will be listening on port 3000.
The output directory contains the files generated by vite build. The Vercel build command will copy the contents of this directory to its output.
For convenience, I will add the following scripts to the package.json file in the workspace root for starting and building the app.
{ "private": true, "workspaces": ["api", "app"], "scripts": { "build": "vercel build", "start": "vercel dev" }, "dependencies": { "vercel": "^32.2.3" }}The first time you run the Vercel CLI, it will ask you to log in. If you have an existing Vercel account, you should use the same login method you used to create your account. If you don't have an existing account, you can choose your preferred method, and an account will be created for you. You can use that login to access your project from the Vercel dashboard after it has been created.
With that said, I'll go ahead and run the vercel CLI and follow the instructions to log in and create a new project. I have an existing account linked to my email, so I will use my email to log in.
❯ yarn vercelVercel CLI 32.2.3> > No existing credentials found. Please log in:? Log in to Vercel○ Continue with GitHub○ Continue with GitLab○ Continue with Bitbucket● Continue with Email○ Continue with SAML Single Sign-On ─────────────────────────────────○ Cancel? Log in to Vercel email? Enter your email address: da*********@**.comWe sent an email to da*********@**.com. Please follow the steps provided inside it and make sure the security code matches Gentle Collared Peccary.> Success! Email authentication complete for da*********@**.com? Set up and develop “~/Projects/my-app”? [Y/n] y? Which scope should contain your project? daniel-nagy? Link to existing project? [y/N] n? What’s your project’s name? (my-app) react-vite-starter? In which directory is your code located? ./Local settings detected in vercel.json:- Build Command: yarn workspace app build- Development Command: yarn workspace app start --port $PORT- Framework: vite- Install Command: yarn install --frozen-lockfile- Output Directory: app/buildMerging default Project Settings for Vite. Previously listed overrides are prioritized.Auto-detected Project Settings (Vite):? Want to modify these settings? [y/N] n🔗 Linked to daniel-nagy/react-vite-starter (created .vercel and added it to .gitignore)🔍 Inspect: https://vercel.com/daniel-nagy/react-vite-starter/Hkx9kjzFpggQrAd9DvLg5KLSr9VA [1s]✅ Preview: https://react-vite-starter-5ykx0mccz-daniel-nagy.vercel.app [1s]📝 Deployed to production. Run `vercel --prod` to overwrite later (https://vercel.link/2F).💡 To change the domain or build command, go to https://vercel.com/daniel-nagy/react-vite-starter/settingsThe .vercel directory is not committed to version control as it may contain sensitive values or values specific to your local workspace. When setting up a new workspace, you should run vercel and choose "Link to existing project."
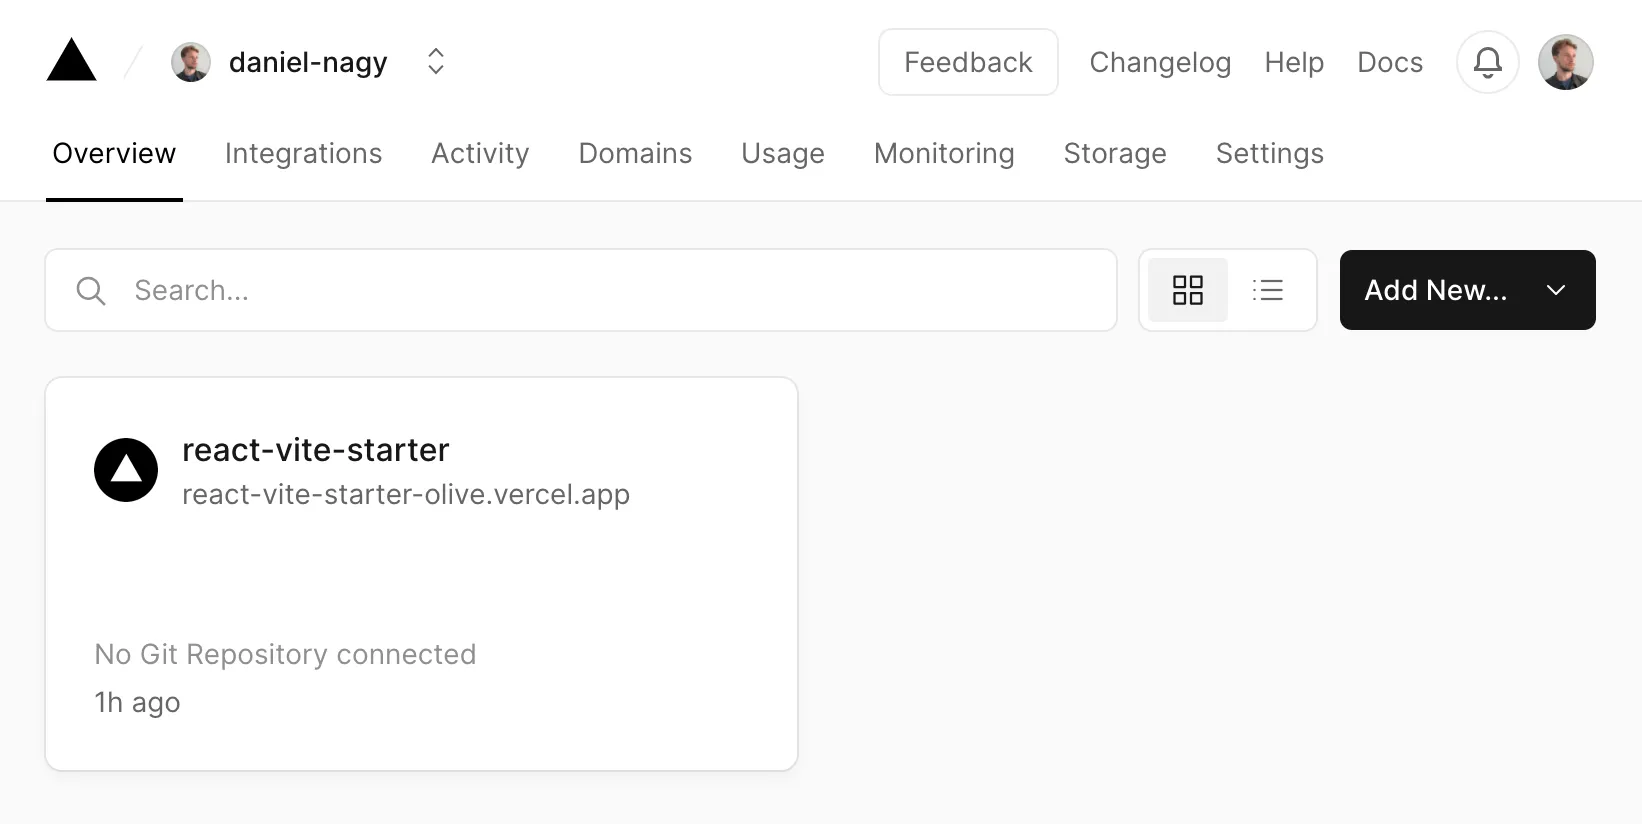
I now have my Vercel app created. Vercel even deployed my app for me and gave me the preview URL. If you open the preview URL in the browser, you will see my app. If I log in to the Vercel dashboard, using the same login, I can see the project I just created.
To run my app locally for development, I will use the start command.
❯ yarn startThis will serve my app on port 3000 like before. I can create a build locally using the build command.
❯ yarn vercel pull❯ yarn buildThe contents of the build will be written to .vercel/output. This is useful for debugging, but I don't really want to build and deploy my app locally. Doing so is prone to error. That is why I will set up continuous integration using GitHub Actions next.
Continuous Integration
I will add some workflows using GitHub Actions to automate the process of building and deploying my app. I will be using a feature of GitHub Actions called reusable workflows to separate my CI and CD workflows.
CI Workflow
First, I will create my CI workflow. This workflow will be responsible for creating a build artifact that is ready to be deployed.
name: CIon: workflow_call: inputs: environment: description: One of production or preview. required: true type: string outputs: build-cache-key: description: The key used to cache the build. value: ${{ jobs.build.outputs.build-cache-key }} secrets: VERCEL_ORG_ID: required: true VERCEL_PROJECT_ID: required: true VERCEL_TOKEN: required: truejobs: build: runs-on: ubuntu-latest env: BUILD_CACHE_KEY: build-${{ github.sha }} VERCEL_ORG_ID: ${{ secrets.VERCEL_ORG_ID }} VERCEL_PROJECT_ID: ${{ secrets.VERCEL_PROJECT_ID }} outputs: build-cache-key: ${{ env.BUILD_CACHE_KEY }} steps: - name: Checkout commit uses: actions/checkout@v3 - name: Install dependencies uses: ./.github/actions/install-dependencies - name: Pull vercel environment information run: yarn vercel pull --yes --environment=${{ inputs.environment }} --token=${{ secrets.VERCEL_TOKEN }} - name: Build app run: yarn build ${{ inputs.environment == 'production' && '--prod' || '' }} --token=${{ secrets.VERCEL_TOKEN }} - name: Create build artifact id: cache uses: actions/cache/save@v3 with: key: ${{ env.BUILD_CACHE_KEY }} path: .vercel/outputLet's break this down. My CI workflow takes a single input called environment, which is either production or preview. It outputs a single value called build-cache-key, which can be used to restore the build artifact later. The decision to use the cache API instead of the artifact API is based on performance and usage limits. However, you can easily modify the workflow to use the artifact API if you prefer. I would advise bundling your serverless functions in that case, but we will get to that later.
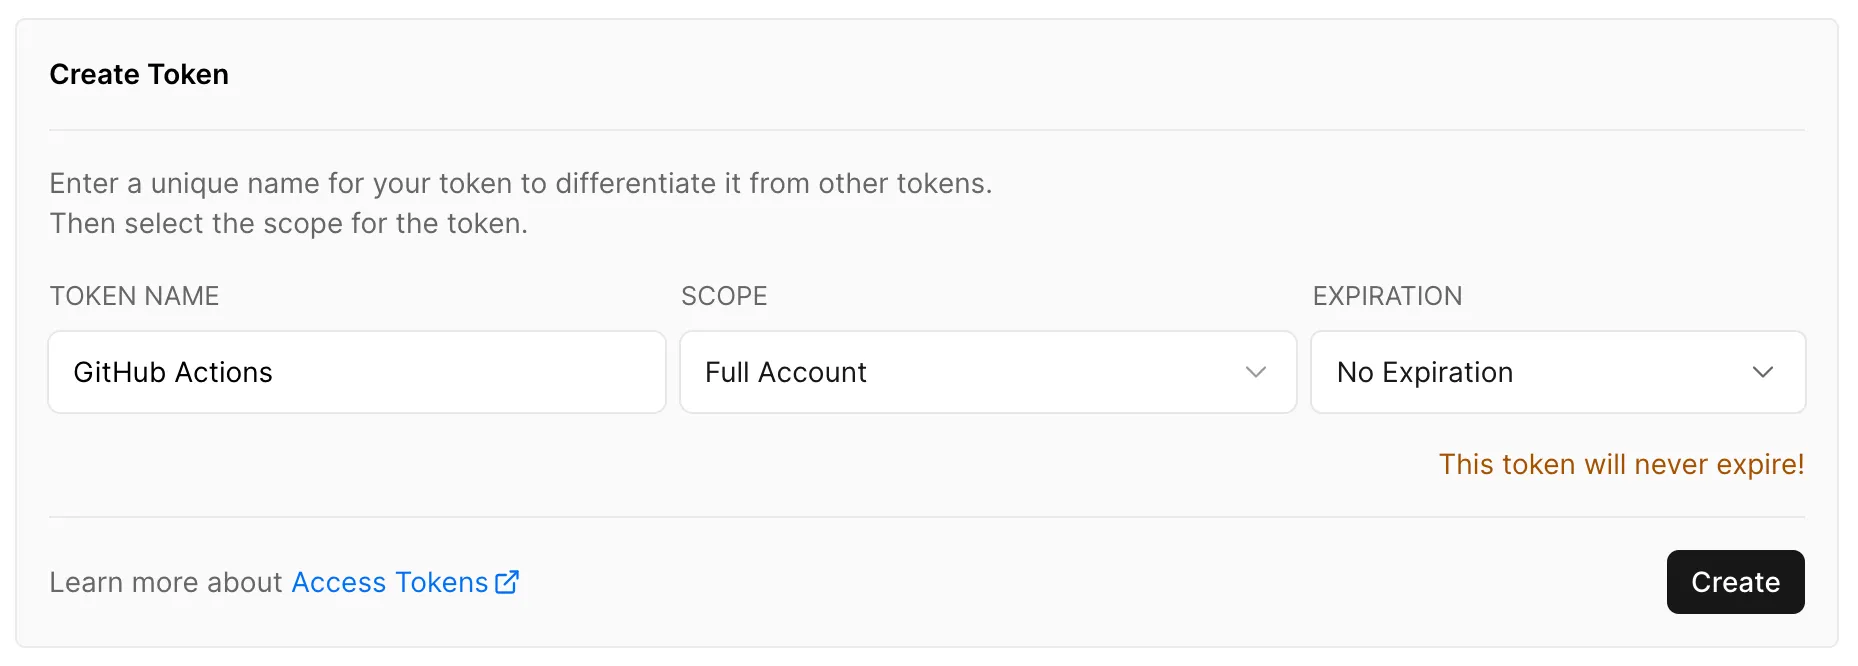
My workflow requires some secrets in order to link to my project in Vercel. These are VERCEL_ORG_ID, VERCEL_PROJECT_ID, and VERCEL_TOKEN. The projectId and orgId can be found in .vercel/project.json, which was created when I created my Vercel project. In addition, I will need to create a Vercel API access token. To create a token, I will go to https://vercel.com/account/tokens. I will use the name GitHub Actions for my token and choose No Expiration so my token never expires.
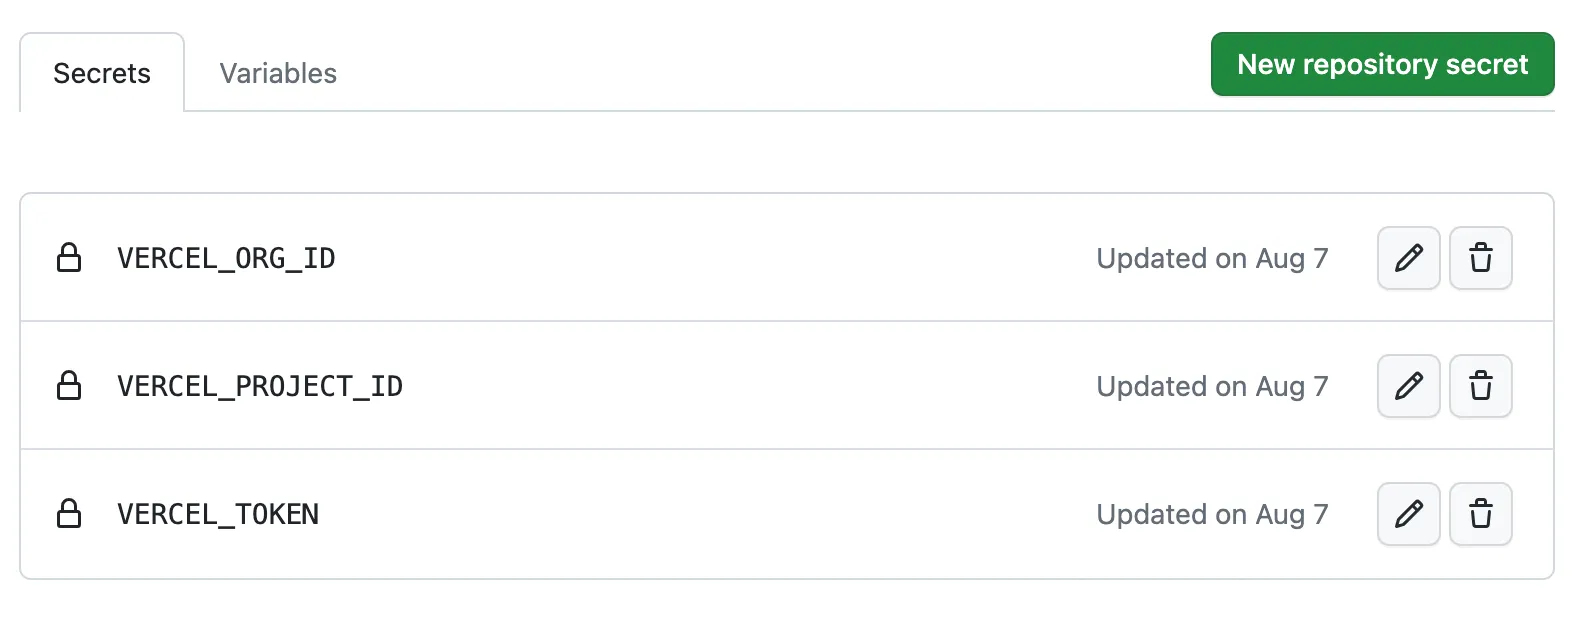
I will add these as secrets in my GitHub repo under settings/secrets/actions.
The CI workflow has a single job called build. The steps of the build process are as follows:
- Checkout the current commit so that the CI server has the source code.
- Install all dependencies (action source code below).
- Pull environment variables for the target environment from Vercel.
- Build the app for the target environment.
- Create a build artifact that can be found later.
The CI workflow is a good place to put other jobs that need to pass before deploying your app, such as running unit tests.
I'm using a reusable composite action to install the dependencies to keep things DRY. Here is the source code for that action.
name: Install Dependenciesdescription: Install all dependencies.runs: using: "composite" steps: - name: Install asdf uses: asdf-vm/actions/setup@v2 - name: Hydrate asdf cache id: hydrate-asdf-cache uses: actions/cache@v3 with: path: ${{ env.ASDF_DIR }} key: ${{ runner.os }}-${{ hashFiles('.tool-versions') }} - name: Install system dependencies if: steps.hydrate-asdf-cache.outputs.cache-hit != 'true' uses: asdf-vm/actions/install@v1 - name: Hydrate node modules cache uses: actions/cache@v3 with: path: "**/node_modules" key: ${{ runner.os }}-${{ hashFiles('**/yarn.lock') }} - name: Install node modules run: yarn install --frozen-lockfile shell: bashThis action uses asdf to install system dependencies and yarn to install my workspace dependencies.
CD Workflow
Let's take a look now at my CD workflow.
name: CDon: workflow_call: inputs: environment: description: One of production or preview. required: true type: string build-cache-key: description: The key used to cache the build. required: true type: string outputs: url: description: The app URL. value: ${{ jobs.deploy.outputs.url }} secrets: VERCEL_ORG_ID: required: true VERCEL_PROJECT_ID: required: true VERCEL_TOKEN: required: truejobs: deploy: outputs: url: ${{ steps.deploy.outputs.url }} environment: name: ${{ inputs.environment }} url: ${{ steps.deploy.outputs.url }} runs-on: ubuntu-latest env: VERCEL_ORG_ID: ${{ secrets.VERCEL_ORG_ID }} VERCEL_PROJECT_ID: ${{ secrets.VERCEL_PROJECT_ID }} steps: - name: Checkout commit uses: actions/checkout@v3 - name: Install dependencies uses: ./.github/actions/install-dependencies - name: Download build artifact uses: actions/cache/restore@v3 id: cache with: fail-on-cache-miss: true key: ${{ inputs.build-cache-key }} path: .vercel/output - name: Pull vercel environment information run: yarn vercel pull --yes --environment=${{ inputs.environment }} --token=${{ secrets.VERCEL_TOKEN }} - name: Deploy to vercel id: deploy run: | url=$(vercel deploy --prebuilt ${{ inputs.environment == 'production' && '--prod' || '' }} --token=${{ secrets.VERCEL_TOKEN }}) echo "url=$url" >> $GITHUB_OUTPUTMy CD workflow has two inputs called environment and build-cache-key. The environment is either production or preview, and the build cache key is required to restore the build artifact that was created in the CI workflow. It outputs a single value called url which is the Vercel deployment URL.
In addition, my CD workflow requires the same secrets as my CI workflow to link to my project in Vercel. The CD workflow has a single job called deploy. The steps of the deployment process are as follows:
- Checkout the current commit so that the CI server has the source code.
- Install all dependencies (same action as above).
- Download the build artifact using the cache key. Fail if not found.
- Pull environment variables for the target environment from Vercel.
- Deploy the app to Vercel and capture the deployment URL in a variable.
On a successful run, the deploy job will create a GitHub environment with the same name as the target environment and the Vercel deployment URL, so I can easily view the deployment in the browser.
Putting My Workflows Together
The last thing I need to do is trigger the CI and CD workflows when a branch is updated. To do this, I will create a workflow that is triggered by pull requests or pushes to the main branch. This workflow will simply call my reusable workflows.
name: Branch Updateon: pull_request: paths-ignore: - .gitignore - README.md push: branches: - main paths-ignore: - .gitignore - README.mdjobs: environment: runs-on: ubuntu-latest outputs: current: ${{ steps.environment.outputs.current }} steps: - id: environment run: | echo "current=${{ github.ref_name == 'main' && 'production' || 'preview' }}" >> $GITHUB_OUTPUT ci: concurrency: cancel-in-progress: true group: ci-${{ github.ref }} needs: [environment] uses: ./.github/workflows/ci.yaml with: environment: ${{ needs.environment.outputs.current }} secrets: VERCEL_ORG_ID: ${{ secrets.VERCEL_ORG_ID }} VERCEL_PROJECT_ID: ${{ secrets.VERCEL_PROJECT_ID }} VERCEL_TOKEN: ${{ secrets.VERCEL_TOKEN }} cd: concurrency: cd-${{ github.ref }} needs: [environment, ci] uses: ./.github/workflows/cd.yaml with: environment: ${{ needs.environment.outputs.current }} build-cache-key: ${{ needs.ci.outputs.build-cache-key }} secrets: VERCEL_ORG_ID: ${{ secrets.VERCEL_ORG_ID }} VERCEL_PROJECT_ID: ${{ secrets.VERCEL_PROJECT_ID }} VERCEL_TOKEN: ${{ secrets.VERCEL_TOKEN }}My Branch Update workflow has three jobs called environment, ci, and cd. The environment job determines the current environment, either production or preview, based on the current branch. The ci job simply calls the CI workflow with the necessary inputs and secrets. Likewise, the cd job calls the CD workflow.
Now, whenever a pull request is created or updated, it will automatically create a preview environment for my app. When a PR is merged into the main branch, it will automatically be deployed to production.
I want to mention that every commit will create a new preview environment, which may be unexpected. At the time of writing this, there is no way, using the Vercel CLI, to update an existing deployment. As a consequence every commit will generate a new URL, even for the same PR. In addition, these deployments will persist even after the branch is deleted. It is possible to delete a deployment using the CLI, but that code is not provided here. I believe the Vercel team is considering deleting old deployments automatically.
Now that I have my app built and deployed automatically, let's transition to server rendering.
Server Rendering
To get started with server rendering, I will create a second entry point to my app that will be used to render my app on the server.
/// <reference types="node" />import { Writable } from "node:stream";import { renderToPipeableStream } from "react-dom/server";
import { App } from "./App";import { type Context, SSRContext } from "./SSRContext";
export async function render(  indexHtml: string,  _href: string,  _cookie?: string | null): Promise<{  context: Context;  headers?: Record<string, string>;  html: string;}> {  const context: Context = { pageNotFound: false, static: false };
  const html = await new Promise<string>((resolve, reject) => {    let data = "";
    const writable = new Writable({      write(chunk, _, callback) {        data += chunk;        callback();      }    }).on("finish", () => resolve(data));
    const { pipe } = renderToPipeableStream(      <SSRContext.Provider value={context}>        <App />      </SSRContext.Provider>,      { onError: (error) => reject(error) }    );
    pipe(writable);  });
  const document = indexHtml.replace(/s*<!--ssr-outlet-->s*/, html);  const headers = {};
  return { context, headers, html: document };}
My render function takes three arguments: indexHtml, href, and cookie. For now, I don't need the URL or the cookie, but later, when I add routing and user authentication, I will need those values. My render function returns an object with the properties context, headers, and html. This allows my app to add headers to the response. This is a good place to put a CSP, for example.
In addition, I use React's context API to provide context to the server about the state of my app. The server can then use this information to send the appropriate response. I can provide whatever context I want to the server; the important thing is that the logic is encapsulated in my app. This keeps the server agnostic of the internals of my app. For completeness, here is the code for my SSR context.
import { createContext } from "react";
export type Context = {  pageNotFound: boolean;  static: boolean;};
export const SSRContext = createContext<Context>({  pageNotFound: false,  static: false});
My render function uses renderToPipeableStream from react-dom/server to render my application on the server. By using renderToPipeableStream, my app can fetch data using a Suspense-compatible HTTP client, and that will "just work." Previously, you would have needed to use something like react-ssr-prepass to perform a prepass on your application, wait for all the data to be fetched, and then render your application.
Finally, I do a string replacement on my index HTML, replacing a comment called ssr-outlet with the content of my application. I'll add that to my index file now.
<body> <div id="root"></div> <div id="root"><!--ssr-outlet--></div> <script type="module" src="/main.tsx"></script></body>Now that I have my server entry point, I will use Vite to generate a separate bundle for rendering my application on the server. I'll do this by modifying the scripts in my app's package.json.
"scripts": { "prebuild": "yarn type-check", "build": "vite build", "build": "yarn build:client && yarn build:server", "build:client": "vite build", "build:server": "vite build --emptyOutDir false --ssr main_server.tsx", "start": "vite --host", "type-check": "tsc"},Now if I run the build command and look at the generated output, I will see two bundles, one for the browser and one for the server.
❯ yarn workspace app buildIt's time to create a serverless function to render my application on the server.
Rendering on the Server
I am now going to create a serverless function that can render my application on the server. First, I'll add some dependencies to my api workspace.
❯ yarn workspace api add @vercel/node❯ yarn workspace api add -D @types/node typescriptThen create the following files:
❯ mkdir api/src❯ touch api/src/ssr.ts❯ touch api/tsconfig.json❯ touch .vercelignoreThe vercelignore file is similar to a gitignore file, and it instructs Vercel to ignore certain files when generating the build. By default, Vercel will include all JavaScript and TypeScript files in the api directory, even if they are not serverless functions. To prevent Vercel from including anything outside the src directory, I will add the following to .vercelignore:
/api/*!/api/srcAnd here is the TypeScript configuration I will be using.
{ "compilerOptions": { "allowJs": false, "allowSyntheticDefaultImports": true, "esModuleInterop": true, "forceConsistentCasingInFileNames": true, "isolatedModules": true, "lib": ["ES2022"], "module": "NodeNext", "moduleResolution": "NodeNext", "noEmit": true, "noUncheckedIndexedAccess": true, "resolveJsonModule": true, "skipLibCheck": true, "strict": true, "target": "ES2022", "types": ["node"], "useDefineForClassFields": true }, "include": ["src"]}A Vercel serverless function is just a module that exports a default function that takes two arguments: request and response. These are VercelRequest and VercelResponse objects. Here is the content of my serverless function.
import { type VercelRequest, type VercelResponse } from "@vercel/node";import { readFileSync } from "node:fs";import { join } from "node:path";import { Readable } from "node:stream";import { createGzip } from "node:zlib";
declare module AppModule {  type Context = {    pageNotFound: boolean;    static: boolean;  };
  export const render: (    indexHtml: string,    href: string,    cookie?: string | null  ) => Promise<{    context: Context;    headers?: Record<string, string>;    html: string;  }>;}
const filesDir = join(process.cwd(), "files");const indexFile = join(filesDir, "../app/build/index.html");const appModuleFile = join(filesDir, "../app/build/main_server.js");
export default async function ssr(  request: VercelRequest,  response: VercelResponse) {  const indexHtml = readFileSync(indexFile, "utf-8");  const App: typeof AppModule = await import(appModuleFile);  const protocol = request.headers["x-forwarded-proto"];  const url = `${protocol}://${request.headers.host}${request.url}`;
  const {    context,    headers = {},    html  } = await App.render(indexHtml, url, request.headers.cookie);
  Object.entries(headers).forEach(([key, value]) => {    response.setHeader(key, value);  });
  response    .setHeader("Content-Encoding", "gzip")    .setHeader("Content-type", "text/html; charset=UTF-8")    .status(context.pageNotFound ? 404 : 200);
  if (context.static) {    response.setHeader("Cache-Control", "max-age=0, s-maxage=86400");  }
  const stream = new Readable();
  stream.push(html);  stream.push(null);  stream    .pipe(createGzip())    .pipe(response)    .on("end", () => response.end());}
To locate files on disk from my serverless function, I use join(process.cwd(), "files") to get the directory where the files are located. I then use a relative path to the output directory, where my Vite build is located, to get the index file and the server bundle. Finally, I call the render function exported from my server bundle with the index file, the URL, and the current cookies.
I take the headers I get back from my render function and add them to the response. I also use the context to set the response status and the Cache-Control header. If the page is static, I instruct Vercel to edge cache it permanently. Vercel automatically invalidates its edge cache when a new deployment is created, so I don't need to worry about content changing between deployments. Finally I gzip the HTML and send it to the browser.
Now I need to tell Vercel to redirect all requests to my serverless function. To do that, I added a rewrite rule to my vercel.json file.
{ "buildCommand": "yarn workspace app build", "cleanUrls": true, "devCommand": "yarn workspace app start --port $PORT", "framework": "vite", "headers": [ { "source": "/assets/(.*)", "headers": [ { "key": "Cache-Control", "value": "public, max-age=31536000, immutable" } ] }, { "source": "/(.*)", "headers": [ { "key": "X-Content-Type-Options", "value": "nosniff" } ] } ], "installCommand": "yarn install --frozen-lockfile", "outputDirectory": "app/build", "rewrites": [{ "source": "/(.*)", "destination": "/api/src/ssr" }], "trailingSlash": false}Now, whenever a request comes in, Vercel will forward it to my serverless function. I added some other configurations as well, so let's talk about that. Enabling cleanUrls will remove the file extension from the URL, preventing someone from navigating directly to the index.html file, which would prevent server rendering. I also recommend setting trailingSlash to either true or false to prevent search engines from indexing multiple pages with the same content. Personally, I prefer setting this to false to remove the trailing /.
I also added a couple headers. By default, Vercel does not allow the browser to cache static assets. However, allowing the browser to cache static assets results in significant performance gains on subsequent page visits. Because Vite automatically adds a hash to the static assets, I don't have to worry about invalidating the cache. In addition, I also added X-Content-Type-Options: nosniff as a best practice.
One last thing I need to do is swap createRoot for hydrateRoot in my app's entry point.
import { createRoot } from "react-dom/client";import { hydrateRoot } from "react-dom/client";import { App } from "./App";
createRoot(document.getElementById("root")!).render(<App />);hydrateRoot(document.getElementById("root")!, <App />);
I'm going to test my serverless function and see if it is working.
❯ yarn workspace app build❯ yarn vercel devReady! Available at http://localhost:3000In a separate terminal, I will use curl to get the page content. I could also open http://localhost:3000 in the browser and disable JavaScript in the dev tools to verify it is working.
❯ curl --compressed http://localhost:3000<!DOCTYPE html><html lang="en"> <head> <meta charset="UTF-8" /> <meta name="viewport" content="initial-scale=1, maximum-scale=5, viewport-fit=cover, width=device-width" /> <script type="module" crossorigin src="/assets/index-de72fd8f.js"></script> </head> <body> <div id="root"><div>Hello, World!</div></div> </body></html>It seems to be working, but not so fast. Let's deploy my app and see what happens.
❯ yarn build❯ yarn vercel deploy --prebuilt✅ Preview: https://react-vite-starter-5pi6jmqn0-daniel-nagy.vercel.app❯ curl --compressed https://react-vite-starter-5pi6jmqn0-daniel-nagy.vercel.app<!DOCTYPE html><html lang="en"> <head> <!-- omitted for brevity --> </head> <body> <div id="root"><!--ssr-outlet--></div> </body></html>What happened?!?! It turns out Vercel's filesystem priority is what happened. When using rewrites Vercel gives priority to the filesystem. When I requested the index page, Vercel found a file named index.html and delivered that instead of calling my serverless function. I can confirm this by using curl again, but with an arbitrary path this time.
❯ curl --compressed https://react-vite-starter-5pi6jmqn0-daniel-nagy.vercel.app/foo<!DOCTYPE html><html lang="en"> <head> <!-- omitted for brevity --> </head> <body> <div id="root"><div>Hello, World!</div></div> </body></html>Now I get the expected result. I didn't catch this locally because the Vite dev server uses an in-memory file system, so it never writes the files to disk. To solve this problem, I will need to rename the index file to something else when building my app. To do this, I'm going to create a simple Vite plugin.
import { type Plugin } from "vite";
export const renameIndexFile = (name: string): Plugin => ({  apply: "build",  enforce: "post",  name: "rename-index-file",  generateBundle(_options, bundle) {    if (bundle["index.html"]) {      bundle["index.html"].fileName = name;    }  }});
Then update the plugins array to rename the index file.
plugins: [react()], plugins: [react(), renameIndexFile("main.html")],Now, when I build my app, I will get a file named main.html instead of index.html. I need to update my serverless function as well.
const indexFile = join(filesDir, "../app/build/index.html"); const indexFile = join(filesDir, "../app/build/main.html");Let's deploy again and see if that fixes it.
❯ yarn build❯ yarn vercel deploy --prebuilt✅ Preview: https://react-vite-starter-g60gol09z-daniel-nagy.vercel.app❯ curl --compressed https://react-vite-starter-g60gol09z-daniel-nagy.vercel.app<!DOCTYPE html><html lang="en"> <head> <!-- omitted for brevity --> </head> <body> <div id="root"><div>Hello, World!</div></div> </body></html>Yay, it's working! But not so fast... What happens if I try to run my app locally for development?
❯ rm -r app/build❯ yarn startThis Serverless Function has crashed.
My function crashes because the build does not exist. If the build does exist, then it will seem like it is working at first, but as I make changes, the app will not update. This is when things get more complicated than they need to be. I can't simply forward the request to my Vite dev server from my serverless function in development because I do not know what port my Vite dev server is running on. Even if I did know what port it was running on, proxying every request to my Vite dev server through my serverless function adds significant overhead during development.
Unfortunately, the best solution I've been able to come up with so far is to not allow Vercel's dev server to proxy the Vite dev server. For the time being, I can just revert my start command back to starting my Vite dev server directly.
"start": "vercel dev" "start": "yarn workspace app start"However, I want to server render my app during development so I can get instant feedback if I make a change that breaks server rendering. Trust me, you do not want to make a bunch of changes and then find out server rendering is broken. To do this, I'm going to create another Vite plugin that will render my app on the server during development.
import { readFileSync } from "node:fs";import { type ServerResponse } from "node:http";import { extname } from "node:path";import { Readable } from "node:stream";import { createGzip } from "node:zlib";import { type Connect, type Plugin } from "vite";
type Input = {  entryFile: string;  indexFile: string;  render(    entryModule: unknown,    indexHTML: string,    req: Connect.IncomingMessage,    res: ServerResponse  ): string | Promise<string>;};
export const ssr = ({ entryFile, indexFile, render }: Input): Plugin => ({  apply: "serve",  name: "ssr",  configureServer(server) {    return () => {      server.middlewares.use(async (req, res, next) => {        if (!req.url) return next();        if (!req.headers.host) return next();
        const url = new URL(req.url, `http://${req.headers.host}`);
        if (extname(url.pathname) && url.pathname !== "/index.html")          return next();
        const indexHtml = await server.transformIndexHtml(          req.originalUrl!,          readFileSync(indexFile, "utf-8")        );
        const entry = await server.ssrLoadModule(entryFile);        const html = await render(entry, indexHtml, req, res);        const stream = new Readable();
        res          .setHeader("Content-Encoding", "gzip")          .setHeader("Content-type", "text/html; charset=UTF-8");
        stream.push(html);        stream.push(null);        stream          .pipe(createGzip())          .pipe(res)          .on("end", () => res.end());      });    };  }});
Then update my Vite config to use this plugin to render my app on the server.
import react from "@vitejs/plugin-react";import { defineConfig } from "vite";
import { renameIndexFile } from "./vite-plugin-rename-index-file";import { ssr } from "./vite-plugin-ssr";
type EntryModule = typeof import("./src/main_server");
export default defineConfig({  build: {    emptyOutDir: true,    outDir: "../build",    sourcemap: "hidden",  },  envDir: "../",  plugins: [    react(),    renameIndexFile("main.html"),    ssr({      entryFile: "./src/main_server.tsx",      indexFile: "./src/index.html",      async render({ render }: EntryModule, indexHtml, req, res) {        const host = req.headers["x-forwarded-host"] ?? req.headers.host;        const url = `http://${host}${req.originalUrl}`;
        const {          context,          headers = {},          html,        } = await render(indexHtml, url, req.headers.cookie);
        Object.entries(headers).forEach(([key, value]) =>          res.setHeader(key, value)        );
        res.statusCode = context.pageNotFound ? 404 : 200;
        return html;      },    }),  ],  root: "src",  server: {    port: 3000,  },});
Let's test this and see if it works.
❯ yarn start  VITE v4.4.9  ready in 327 ms
  ➜  Local:   http://localhost:3000/  ➜  Network: http://192.168.86.78:3000/
❯ curl --compressed http://localhost:3000<!DOCTYPE html><html lang="en"> <head> <script type="module"> import RefreshRuntime from "/@react-refresh" RefreshRuntime.injectIntoGlobalHook(window) window.$RefreshReg$ = () => {} window.$RefreshSig$ = () => (type) => type window.__vite_plugin_react_preamble_installed__ = true </script>
<script type="module" src="/@vite/client"></script>
<meta charset="UTF-8" /> <meta name="viewport" content="initial-scale=1, maximum-scale=5, viewport-fit=cover, width=device-width" /> </head> <body> <div id="root"><div>Hello, World!</div></div> <script type="module" src="/main.tsx"></script> </body></html>Hooray! It is working 🎉.
But I want More APIs!
I am no longer running the Vercel dev server during development, so it is not possible to add more serverless functions and call those during development. Let's see if I can fix that. To start, I'm going to add concurrently as a dependency to the workspace root.
❯ yarn add -D -W concurrentlyNow I'm going to modify the start script to run the Vite dev server and the Vercel dev server at the same time.
"build": "vercel build","build": "yarn workspace app build && vercel build","start": "yarn workspace app start""start": "concurrently 'yarn workspace app start' 'vercel dev -l 4000'"I'm telling Vercel to listen on port 4000. Let's run the start command and see what happens.
❯ yarn start$ vite --host[0] VITE v4.4.9 ready in 303 ms[0][0] ➜ Local: http://localhost:3000/[0] ➜ Network: http://192.168.86.78:3000/[1] > Running Dev Command “yarn workspace app start --port $PORT”$ vite --host --port 4000[1][1] VITE v4.4.9 ready in 289 ms[1][1] ➜ Local: http://localhost:4000/[1] ➜ Network: http://192.168.86.78:4000/[1] > Ready! Available at http://localhost:4000Vercel ran the devCommand and started a second instance of the Vite dev server 🤦♂️. Let's remove the dev command and see what happens.
❯ yarn start$ vite --host[0] VITE v4.4.9 ready in 299 ms[0][0] ➜ Local: http://localhost:3000/[0] ➜ Network: http://192.168.86.78:3000/[1] > Running Dev Command “vite --port $PORT”[1][1] VITE v4.4.9 ready in 174 ms[1][1] ➜ Local: http://localhost:4000/[1] ➜ Network: use --host to expose[1] > Ready! Available at http://localhost:4000Oof. Vercel used a default dev command for the Vite framework. To spare you from this process of elimination, the final solution is to set framework to null and to remove the build command. This tricks Vercel into thinking my site is completely static. If I just set the framework to null and leave the build command, then Vercel will try to build my app when I start the dev server, which is not what I want.
{ "buildCommand": "yarn workspace app build", "buildCommand": "", "cleanUrls": true, "devCommand": "yarn workspace app start --port $PORT", "devCommand": "", "framework": "vite", "framework": null,}The following is for educational purposes and is not included in the template.
Now that I can start the Vite dev server and the Vercel dev server at the same time with no issues, I'm going to add a second serverless function.
import { type VercelRequest, type VercelResponse } from "@vercel/node";
export default function random(  _request: VercelRequest,  response: VercelResponse) {  response.json({ number: Math.random() });}
This is a simple request handler that returns a random number. I'll use react-query to consume this API from my application.
import { type FC } from "react";import { useQuery } from "react-query";
export const App: FC = () => <div>Hello, World!</div>;export const App: FC = () => {  const { data } = useQuery("random", () =>    fetch("http://localhost:4000/random")      .then<{ number: number }>((res) => res.json()),    { suspense: true }  );
  if (!data) return <div>loading...</div>;
  return <div>Random number: {data.number}</div>;};
I use React's suspense API to fetch the random number so that when my app is rendered on the server, it will wait for the data to be fetched before sending the HTML to the browser. The code for creating the QueryClient is omitted here.
If I open http://localhost:3000 in the browser, I will see something odd. I will see the random number for a second, but then it will disappear. Looking at the console in the browser's developer tools reveals that the browser has blocked the request because it violates its CORS policy.
Access to fetch at http://localhost:4000/random from origin http://localhost:3000 has been blocked by CORS policy: No 'Access-Control-Allow-Origin' header is present on the requested resource.
CORS is a browser feature that limits the sharing of cross-origin resources. A resource must explicitly allow other origins to access it when using certain browser APIs, such as fetch. When I render my app on the server, it works because my server is not a browser and therefore doesn't enforce CORS. So my server is able to make the request, and the random number is included in the HTML sent to the browser.
The problem is when I try to fetch the data in the browser. You may be tempted to fix this by adding Access-Control-Allow-Origin: * as a response header. That would indeed make it work, but that would also allow other websites to use your API. Also, the above code will not work in production because the origin is hard-coded. In production, my API and my app will be same-origin. What I really want is to make the request relative to the origin. However, because of the hoops I had to jump through to get server rendering to work, my API and app are on different origins during development.
The best way that I know of to fix this is to proxy my API through Vite's dev server. Then, from the browser's perspective, the request will be same-origin.
server: { port: 3000, proxy: { "/random": { changeOrigin: false, target: "http://localhost:4000", }, },},Setting changeOrigin to false will allow me to test my app on another device on my local network, using my local IP address, and have that continue to be the same origin. I have another problem, though. Node's fetch does not support relative paths. This is because Node itself is not a Web server and therefore does not have an origin. To fix this, I will add the origin to the SSRContext for the sake of this example.
import { SSRContext } from "./SSRContext";
export const App: FC = () => {  const { origin } = useContext(SSRContext);  const { data } = useQuery("random", () =>    fetch("http://localhost:4000/random")    fetch(`${origin}/random`)      .then<{ number: number }>((res) => res.json()),    { suspense: true }  );
The origin comes from the href argument passed to my render function on the server. I set the default origin equal to the empty string, making the request relative to the origin in the browser.
const context: Context = { origin: new URL(href).origin, pageNotFound: false, static: false};To avoid having to create a new proxy for every serverless function, I can prefix all my API calls with a path such as api. Then create a rewrite rule in vercel.json that rewrites api/* to api/src/*.
"rewrites": [ { "source": "/api/:path*", "destination": "/api/src/:path*" }, { "source": "/(.*)", "destination": "/api/src/ssr" }]Then I only need a single proxy in Vite.
proxy: { "/api": { changeOrigin: false, target: "http://localhost:4000", },},To Bundle or Not to Bundle?
There are a few reasons why you might want to bundle your serverless functions into a single serverless function.
Performance
You can improve performance by bundling all your serverless functions into a single file. There are two reasons this may help with performance. The first reason is that it cuts down on file IO when starting your serverless function because it doesn't need to import any other modules. The second way this may help with performance is that it limits the number of serverless functions that may need to restart on any given request to just 1. If a single request required multiple serverless functions to restart in a head-of-line blocking fashion, then that could cause a significant delay in the response.
Avoid Node Modules Hell
Vercel will include a node_modules directory for each of your serverless functions. Most of your serverless functions will require the same dependencies. Those dependencies will be duplicated for each serverless function. This results in a YUGE prebuilt Vercel app that can bring CI pipelines to their knees. By bundling all of your serverless functions, there will be no node_modules, and your builds will be significantly smaller.
Avoid Limits on Vercel's Hobby Plan
Vercel's hobby plan has a limit of 12 serverless functions. Vercel treats every JavaScript and TypeScript file in your API directory as a serverless function, even if it is just a module, unless you prefix it with _. By bundling all your serverless functions into a single function, you can avoid hitting the 12 function limit and having to prefix your modules with _.
Bundling My Serverless Functions
I am going to use esbuild to bundle my serverless functions into a single serverless function. I'll start by adding esbuild as a dependency to the api workspace.
❯ yarn workspace api add -D esbuildNext, I'll create an esbuild script and an entry point for my serverless function.
❯ touch api/.gitignore api/esbuild.js api/src/main.tsHere is the content of main.ts.
import { type VercelRequest, type VercelResponse } from "@vercel/node";
import { ssr } from "./ssr";
export default function main(request: VercelRequest, response: VercelResponse) {  const protocol = request.headers["x-forwarded-proto"];  const url = new URL(`${protocol}://${request.headers.host}${request.url}`);
  switch (url.pathname) {    default:      return ssr(request, response);  }}
My entry point creates a primitive router using a switch statement. And here is the content of esbuild.js.
import esbuild from "esbuild";
const [, , ...args] = process.argv;
/** * @type import("esbuild").BuildOptions */const options = {  bundle: true,  entryPoints: ["src/main.ts"],  format: "esm",  outfile: "build/main.js",  platform: "node",  sourcemap: true};
if (args.includes("--watch")) {  const ctx = await esbuild.context(options);  ctx.watch();} else {  await esbuild.build(options);}
If I run the esbuild script with --watch, then it will run esbuild in watch mode. I'll add some scripts to api/package.json to encapsulate this.
"scripts": { "build": "node esbuild.js", "start": "yarn build --watch"},Inside of .gitignore, I ignore the build directory generated by esbuild. I'm going to make the following changes to api/tsconfig.json:
"jsx": "preserve", "lib": ["ES2022"], "module": "NodeNext", "moduleResolution": "NodeNext", "module": "ESNext", "moduleResolution": "Bundler",Changing module to ESNext and moduleResolution to Bundler will spare me from all those confusing Node.js module rules. In addition, adding jsx preserve will allow me to make this change in api/src/ssr.ts.
declare module AppModule {  type Context = {    pageNotFound: boolean;    static: boolean;  };
  export const render: (    indexHtml: string,    href: string,    cookie?: string | null  ) => Promise<{    context: Context;    headers?: Record<string, string>;    html: string;  }>;}type AppModule = typeof import("../../app/src/main_server");
So now I can reference the source types directly so that they are always up-to-date. Now I need to make some changes to Vercel. In .vercelignore, I need to make the following change:
!/api/src!/api/buildIn vercel.json, I need to make the following changes:
"functions": { "api/build/main.js": { "includeFiles": "api/build/**" } }, "rewrites": [{ "source": "/(.*)", "destination": "/api/src/ssr" }], "rewrites": [{ "source": "/(.*)", "destination": "/api/build/main" }],The functions configuration instructs Vercel to include all files that end up in the build directory. This is useful if your build produces multiple files (like if you're using Prisma, for example). I also updated my rewrite rules to rewrite all requests to the main file in the build directory.
The last thing I need to do is update my scripts in package.json.
"scripts": { "build": "yarn workspace app build && vercel build", "start": "concurrently 'yarn workspace app start' 'vercel dev -l 4000'" "build": "yarn workspace api build && yarn workspace app build && vercel build", "start": "concurrently 'yarn workspace api start' 'yarn workspace app start' 'vercel dev -l 4000'" },As you can see, I now have an additional build step for my API that is outside of Vercel, much like my React application. With that, I can now run the start command and open http://localhost:3000 in the browser, just like before. When I build my API for production, it will only produce a single file.
That concludes today's post. I hope you enjoyed reading it!

Written by Daniel Nagy
Daniel is a software engineer and full-stack web developer. He studied computer science at Ohio University and has been doing web development and hybrid mobile app development since 2014.
If you liked this post, then please consider donating or becoming a sponsor. Your support will help me produce more content that gives back to the community.
Comments
You will not receive notifications for new comments. If you are waiting for a reply, please check back periodically.